We had so much fun making birthday candles for Keats’ birthday, that this week we decided to try making some more. We came up with a pretty good system, and I thought you guys might want details!

For starters, we didn’t use traditional candle wick this time, but made our own using inexpensive hemp cord. Beeswax is a slower melting wax than typical birthday candle wax (paraffin) and hemp burns more slowly than cotton, so it is a good match for the beeswax.

I melted our beeswax in a two cup glass measuring cup (that I reserve for beeswax) in a pot of simmering water on the stove, but you could use a large tomato can to hold the wax instead. If you can’t find beeswax locally you can purchase beeswax pellets on Amazon. I think purchasing a pound is a good bet. You need enough to fill your container to a depth of at least three inches. You can always find something to do with leftover beeswax. Once your wax is melted, you will want to measure the depth of your wax and the depth of your container to determine the length you should cut your twine. The depth of the wax is only important because it will determine the length of your candles. We thought three inches was a good length. My wax was about 3 inches deep and my container 4 inches. I cut 7 inch lengths of twine so I would have enough for tying knots on each end.

To weigh the twine down so it hangs straight in the melted wax you will need something like a metal washer to attach at one end. Mine were small and light, so I tied three to the bottom of each piece of twine.

Next I connected the other end of the twine to a pencil and made sure the length from the base of the washers to the pencil was 4 inches because my container was 4 inches deep.

I worked with five wicks at a time.

To prime the wicks, a simple process that stiffens them, makes it easy to set them nice and straight, and helps them to burn evenly, you place the pencil over your container of melted wax and let the wicks soak for a few minutes.

When they are finished soaking, remove them from the wax and place them over an empty can to dry and harden.

Once the wicks are dry (they dry quickly,) cut off the washers and use your fingers to gently straighten the wicks if necessary. (I usually found it necessary.) Repeat the priming process until you have primed as many wicks as you need.

Now you are ready to start dipping your candles. I brought the melted wax to the table for safety because my kids were helping. After a little while I would have to return it to the pot of simmering water to melt again. We used the loop at the top as a handle. It took us quite a few dips to reach the diameter we were aiming for. Dip quickly so that you don’t melt the previous dip’s wax layer. Let the wax dry and harden just a bit between dips. We found that the longer you wait, the better your next layer will coat the candle.

Every single one of my kids, including four year old Beatrix, successfully made candles. The dipping part is very simple and very addictive I might add.

Finished candles were strung on the pencil and hung over the can to fully harden.


When working on these by myself, I created a little assembly line. I would work on 8 or more candles at a time, dipping each one, letting it cool slightly and then placing it on a sheet of wax paper before picking up the next one, and so on until they were finished.

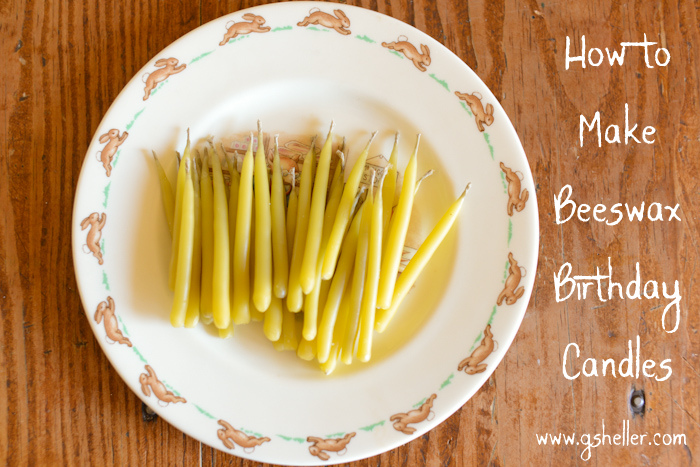
The wax naturally drips to the base of each candle, creating a long drip that I cut off, just to the base of the wick, once the candles were fully hardened. I then used the warmth of my fingers to gently smooth the base of each candle. The last step is to trim off the loop of twine at the top of each candle.

There you have it: Homemade beeswax birthday candles!
Disclaimer: My only qualification in writing this tutorial is my willingness to do so and the experience we had making them. They seem to burn quite evenly. The beeswax is so much nicer than typical birthday candles because it burns slowly, resulting in less dripping, not to mention the fact that it is all natural! There are more “correct” ways out there to make candles of this sort I am sure, but this worked well for us.


The trick with wicks is to always soak them in a borax solution.
They will not char in a breeze, the color of the flame is quite good too.
How lovely, I bet your whole house smelled wonderful when you made these. Can I please share this link on my Facebook page? Here is my page https://www.facebook.com/ThePotOfGoldHandmadeByKitty?ref=hl I think my friends + family would like to see your tutorial too.
You are more than welcome to share. Thank you!
Love this! I ordered some beeswax pellets from Amazon the other day and now I just need to find our spool of hemp and some washers. 🙂
Ginny,
It’s been awhile since we made candles. I love the idea of using the hemp cord for the wick! We have that around the house because I use it to tie our buttons on cards.
Thanks for the tutorial, I’m going to pin it on pinterest so I can refer back.
Love,
Taryn
Oh I would love to do this for advent, wouldn’t it be pretty with a natural earthy Christmas theme? Thank you for sharing, I had thought that candles were made in moulds, it looks to be a very soothing project. I can’t wait to purchase the materials and give it a try.
These are very nice. I haven’t made them, but I use some I purchased and they are beautiful, natural and they last a long time and don’t need little candle holders. I gently wash them and save them to use repeatedly. I also found that hannukah candles come in large quantity and make nice reusable birthday candles in many colors. I have even found hannukah candles in beeswax. It is nice not to worry whether you have candles on hand for a birthday.
Lovely post as usual. I never heard whether you won the apt. Therapy contest?
Thanks Brigitte! I’m sorry, I forgot to mention the contest. Yes, Small Things won! I updated today’s post with that information. Thank you for reminding me!
Thank you for these helpul explanations!
I’ve only one wish: to try!
I love this. I just noticed your disclosure about amazon. I buy many things through Amazon and I would love to know how it work to get your family the credit. Is it only for things you post here ?
It’s actually a small percentage of any sale in which you enter Amazon via a link on my blog and then make a purchase. So if you click through a book link for instance, and then end up buying something else, I will get a small percentage from that sale. It took me a long time to figure it out, but I’ve always linked to Amazon because it’s easy and such a good place to read reviews–and I do buy things there, so it seemed like a good idea to sign up for the program!
This looks like so much fun-I want to try this! Thanks for telling us where to buy the products, that is so helpful.
Going to try with my grandkids.
Such a fun activity, and I love how they look all lit up on the cake! I remember making candles in elementary school, and rotating in a single file line to take turns dipping in the wax and letting it cool. I still have the candles that I made because I never wanted to burn them!
Those are gorgeous and I love that they are natural. But, I worry I lack the patience to do it. Hence, I will enslave my 13yo daughter to do this for me. Yes, I will. Thanks for the tutorial!
Thanks for sharing this. I love your tips on efficiency. We have at least a half pound of beeswax and I want to try!
Such fun! I am always a sucker for beeswax and bunny bowls, so you have me well and truly. I would love to make these– perhaps we will squeeze in time this weekend. Thank you for the inspiration.
Love this idea! I have some beeswax pellets left over from making lotion – I bet I can use them!
Hi Ginny, I’ve been following your blog for a while. But now I’d like to thank you for this tutorial. And – as I saw the picture of your hemp, I knew I want send you a hello from Hungary!
Thanks for this tutorial— so funny, I actually bought hemp wicks and beeswax last week with plans to make birthday candles with my kids— but I had no idea how to do it so this is so timely for me! 🙂
Thank you for sharing this tutorial.
We tried to make candles in a similar way to Candlemas. Next time I’ll try and own beeswax wick of string. Thanks and regards from Slovakia.
http://letitia-tiba.blogspot.sk/2013/02/ako-sme-si-vyrabali-hromnicku.html
This post is about our candles
These are so cool!! Thanks for sharing. Can’t wait to try!
I love this! We are going to have to make these Ginny. 🙂
I’ve followed your blog for a short while and I love posts like this. So simple to follow along for a newbie. My kids are older now, the baby is 15 but I think we would still enjoy doing something like this, just for fun. I love all the pictures of your garden and chickens. We had a pet chicken for a while when my daughter incubated some eggs and successfully hatched six chicks. We gave all but one away and my son made a coop that looked like a dog house. We kept it very clean and spoiled our pet chicken but neighbors still complained. Technically we’re not allowed to have livestock in our subdivision. Hence, your photos elicit fond memories.
Thank you Ginny! I am always in search of things to do with the beeswax I’ve collected from my hives. I love the smell of beeswax candles.
You’re such a clever girl.
Metal washers at the end! Genius! Thanks for sharing. I have been thinking about candlemaking for a while. Now I am ready to do this. 🙂
Best wishes from Austria,
Katharina
I will never buy another birthday candle again! Ginny, thanks so much for taking the time to write this up, I can’t wait to try it here.
I am not perfect. So this is just my style!
The girls are going to love it.
Thank you!
Thank you we will love to try it out.
I made dipped candles as a kid, and loved it! My boys were reading your blog with me this morning and are now very keen to try making candles of their own. Thanks for the how-to’s!
What would be your suggestion if we wanted to add color to our candles?
I don’t know how to add color. You might just google that one.
We use left over bits and scraps from our colored beeswax sheets added into the melted beeswax. They color it beautifully! Just be careful not to mix colors.
I love that you shared this Ginny. We always buy our beeswax candles for birthday cakes (but roll the ones for the birthday ring), this would be so much cheaper and fun!
XOXO
p.s. I have to talk to you about my sponsor for RCIA… She was sent to me for sure!! <3
This looks like a lot of fun! I think I might try this with the Grands!
Thank you for sharing this! We have three birthdays (eek!) coming up in March and I’d love to make these!